Saturday, December 5, 2015

Ochre Pocket Malden as my wallet

Hello planner girls! I'm back. Yay!!! November was pretty crazy. It started really really off but I'm glad I was able to turn it around with the help of a couple of friends. Woot! Woot! 

So anyway, moving forward, look at the new beauty that I have: an ochre pocket Malden! It's so gorgeous and the leather is phenomenal.


I puchased this planner because I started feeling that my Filofax Mini was getting too small for me and I wasn't really using it to its function anymore. So here, I am going to share with you how I was able set it up as my wallet. Here are most of the things I used for the main set up. 


I found a cheap multi ID holder at National Bookstore for only Php20.25. So that's 4 card slots for the entire ID holder and each slot can also carry 2 cards at a time. I'm not sure what this size really is but it's a great size for pocket sized planners. I simply cut the top side, aligned it to a pocket envelope in my planner to mark the holes and punched using a handy one-hole punch. 


After getting the card slots ready, I started preparing some dividers for my wallet. I have this American Crafts Just Write recipe cards that is also the perfect size for a pocket sized planner. I also love  that the tabs are in different shapes. 


This was much easier to prepare than the card slots because my Muji Travel puncher easily punched through it. 


Now that my dividers are ready, I can prepare the inserts that I am going to use for it. I bought a 100 piece grid papers from Muji for only Php175 and it seemed perfect to make into inserts. Muji has  nice paper quality and there is usually no bleed through with their papers. I cut my paper to 3.05" x 5" with my Recollections paper trimmer but that is only my preferred size because I didn't want my inserts to peek through my recipe card dividers. 


I also easily punched through 3-4 sheets of paper with my Muj travel puncher. 


The puncher is really perfect for travel because I can even put it in the back slip pocket of my Malden. 


Last but not the least, more inserts! 

I stamped on the intended scratch pages with my StudioL2e stamps. I'll get you a better picture next time. 
 
And my Mommylhey Doodles Chores set for tracking bills. 


That's it! My wallet is now all set up for use. I'll probably add more inserts and label the divisions along the way but I'm already quite satisfied with how it looks like as of now. I hope you enjoyed reading through my set up! Are you also using a Filofax binder as wallet or have intentions of using one? Do tag me on my Instagram @lionachinky when you do. 

Monday, November 2, 2015

A flamingo in a flock of pigeons: November PnJplannerkit

Hey planner girls! I'm back with another Planners & Journals #PnJplannerkit reveal. Can you believe it's already November? Well, I can't! Time's ticking too fast.

Now I know the PnJ subscribers have already received their kits. I actually just got mine today because I went on a short trip to Baguio with my boyfriend's family. Hihi. Anyway, although a lot of you have already rummaged through your kit and have actually started using them, I still wanted to blog about all the inclusions in the kit.

Now, I have to warn you.. this post will be a pretty long one because aside from showing the kit's contents, I'm also going to show you how I'll be using what's in the kit, as well as share how I decorated my week with the kit. 

Let's get started! I have the personal sized kit for ring bound planners but I've actually been contemplating if I should try the TN kit for my Fundori (PnJ's fabulous printed leather fauxdori). What do you guys think? Should I give in? 

The theme of this month's kit is Happy Flamingos. It's all about flamingos and watercolor! This month, Planners&Journals collaborated with watercolor artist, Ms. Natalia Noguiera, of 
@lagartixashop for all watercolor flamingo images. 

I love the dashboard that came with the kit. The watercolor effect on it is perfection. It came with a quote by Jarod Kintz that says, "when the silent flamingo dances pink with desire, I'll be there sipping on owl stares and kitten curls". 


It also has the usual inserts that comes with each kit. 3 pcs back-to-back week on 1 page..


5 pcs back-to-back week on two pages...  


and 15 pcs back-to-back daily to do page. 


How cute are the lemonade glasses for water intake tracker? I love them!! ...even though I don't drink that much water. Oops! Shhhh. 

You will also be getting an assortment of cardstock and journal cards, 


2 sheets of adorable stickers from The World of Fraffee


4 pcs of coloring post cards with images by SanqunettiDesigns and a Simbalion Watercolor Cake with 8 colors, 

a flamingo paper clip by iprints and a handcarved rubber stamp by CraftAvenuePH. That's right! A handcarved rubber stamp for each and every kit! Crazy good right?? 


Oh and you'll also get these awesome tattoo and band-aid with the same theme as extras! How cool is that? Who wants more? Cause I definitely do!! 


There you go! What did you think about the kit? Now I thought the kit was so nice that I started tinkering right away. 

My first dilemma was the binder to use: The Filofax Original in Dark Aqua or the Filofax Malden in Aqua. I received both binders in October so I really wanted to use one of them. I eventually chose the Malden because.. well, I waited for it for so long, why wait longer?? 


The first thing I wanted to make was a new dashboard. Each kit actually comes with its own dashboard but I like to use that as a month's divider in the Daily section of my planner. 

First I cut up the cardstock with the tropical leaves design using my Recollections paper trimmer into 4" x 6.5" size. Then I punched holes using a regular 1-hole punch so that I would know where I to place the decorations I wanted to layer on it. 


I picked out a 3" x 4" journal card that I wanted to layer on top and cut the journal card with the single flamingo design to layer too. 


Then, I brought out my Pink Paisley Citrus Bliss ephemera pack and chose a few addiional embellishments which I then adhered to my design using a Xyron sticker maker. 


So there! thought the final washi tape touch would make it look a little more done. 


Now on to decorating my week.

The very first thing I did on my weekly spread was to put a washi border and to stamp the date. I try to do this first because I tend to forget to leave space for the date at the end of decorating. I used washi tapes from Craftee Dandee and the Brush Dates set from StudioL2e. 


Then I added The World of Fraffee's stickers on the days I knew there was something special or important happening on the day. 


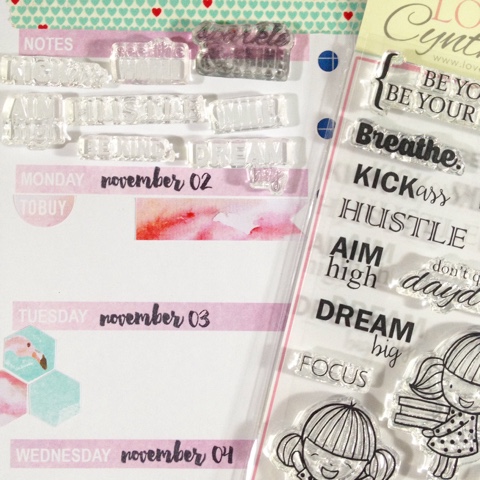
I recenty received my Love Cynthia clear stamps when we had our Planner Party last October 24. I found that one of the sets, Be Your Best Self, had a lot of fun enouraging words so I built them and arranged them to look like a collage of words. 


Now on to more stamping. I used some more stamps from Love Cynthia, and the Hexagon Alphabet set by StudioL2e to decorate the rest of the week. I also used the lister stamp found in MommyLhey Design's My Daily Kawaii v.1 set, 'Craft Room' in Doodled Chores, 'Date Night' and 'Church' from Busy Queen Bee and 'No School' from Teacher's Plan set

Sometimes, you'll need to stamp on spaces smaller than your stamp. That's what happened between the flamingo stamp and stickers on Thursday's design. What I do is cover up a portion of the stamp with washi tape and dab my ink carefully on the clear stamp. That way, I'll only put stamp up to the space needed. 

I also used the flamingo wooden stamp that came with the kit. It stamped so beautifully, I so LOVE it! 


And lastly, I prepared my daily to do by simply stamping on the dates. 


There you go! Thanks for reading this looong post. I hope you somehow enjoyed! 

Have you started using your PnjPlannerkit? We would love to see what you did with yours! Do use the hashtags #PnJplannerkit and #ilovePnJ whenever you post so that we can see your pictures quickly. 

Happy planning, girls! 

Sunday, September 27, 2015

Bonjour October

Bonjour planner girls! It's almost the end of the month...and that means only one thing! The Planners&Journals October planner kits are about to be released!

Planners&Journals collaborated with the wonderfully talented Cynthia Renard , also known as @lovecynthia, for the illustrations in October's planner kit. There were so many wonderful designs that was used for the inclusions of the kit and you'll get to see what those are in this blog post. Yay! 

Ok, can I just say how obsessed I am with her illustrations?! Amazing! She also recently released her super cute acrylic stamps so hurry and go check her shop out!

Now going back, here's a picture of what you will be getting in your kit:


Let's have a quick run through of each item, shall we? :) 

You will get 3 Sheets of colored double-sided weekly in 1 page,


..5 Sheets of colored double-sided weekly in 2 pages,


..and here's a small change in your planner kits starting this October that I don't mind at all! You will get 15 Sheets of colored double-sided daily pages. That's right! Instead of a day on 2 page spread, you'll be getting a day on 1 page instead. I know you might be wondering why there is such a change. Basically, the P&J team discussed and realized that by adjusting the daily pages to just 1 page, there will be more goodies that can be added to your kits and I think we all want more goodies right? Not to worry, you'll still get the important and functional parts of the daily pages such portions for your schedule, to do list, things to buy, notes and water intake tracker.


You will also be getting 2 pieces of sample card stocks, 4 pieces of 4x6 journal cards and 4 pieces of 3x4 journal cards. I noticed that a lot of people like their journal cards to be double sided but I actually prefer mine to have the print on only one side. I guess I like it that way because I use journal cards for my planner and having the print on only one side helps me have less of a difficult time choosing which one to use. It also gives me the liberty to stamp or design on the blank side specifically to my purpose. 


The super cute mini pillow hand sewn by the P&J team and the cute tassel from Tali Ti Amianan below will also come with your kit. Tali Ti Amianan is actually a local brand that makes handmade and eco-friendly products by the local surfers, women and elders in San Juan, La Union. AWESOME!


You will also receive 2 sheets of planner stickers by The World of Fraffee. I think the sticker sheets were printed on semi-glossy material but I don't mind. I usually use Sharpies or Micron when I write on my stickers and washi tape anyway so it wouldn't be a problem. I liked Fraffee's stickers so much that I've already ordered more stickers for my planners! I cannot wait to get them!


And here are my favorite things... embellishments! 

I am totally, absolutely, ridiculously over the moon with the wood veneers and ephemeras that comes with the kit. I'm already thinking of making a few of them into paper clips. Hmm.. or not? Ugh! I can't decide! Oops! Do you ever feel like you don't want to use some of your things because you just want to keep them aside? I think I'm in that position right now! To use or not to use??


There you go! That's a lot of goodies from the kit, right?

I'm thinking of moving back into my gold Kikki K Time Planner for October because I kind of miss using it but I think the Kikki K Why Not matches the kit more? Help me decide? Oh and is there anybody who might be interested in a simple "Plan with me" using goodies from the kit through Periscope? If you think that might interest you, let me know and I'll do it as soon as I can :)

That's about all! I hope you had fun reading through today's blog. Your kits already be on their way to you! Hooray! Don't forget to add the hashtag #PnJplannerkit in your photos, okay? We're very excited for you to get them. 

Merci!

Sunday, September 13, 2015

I shrunk Mommylhey into paper clips!

Hi everyone! I wanted to share with you my new found love – shrink plastic! It’s basically an amazing way to turn your drawings or stamps into cute little paper clips and charms. I've been having a shrinking craze over the past weeks. If you are familiar with the September Planners and Journals PnJplannerkit , you will see a shrink plastic paper clip appearance there too. 

I’m sure you recognize these stamps from the MLD Social Babe set and I will walk you through how I was able to turn them into little paper clips. 


Here are the materials that you will need:

  1. Shrink Plastic 
  2. Stamp sets – I used the MLD Social Babe stamp set
  3. Scissors
  4. Hole puncher (if you want to make charms. I didn’t have enough tools so I wasn’t able to)
  5. Staz On Jet Black
  6. Different colors of Sharpie markers
  7. E600 industrial strength adhesive
  8. Paper clips
  9. Wet wipes (not in picture)
  10. Oven toaster (not in picture)Wax paper (not in picture)


Let’s start! There are two kinds of shrink plastic. One that is smooth on both sides, and one that is already rough on one side. If you have the type of shrink plastic that is smooth on both sides, you will need to sand the other side of the shrink plastic to make it a little rough. The reason why you'll need to sand the shrink plastic is so you will be able to make the coloring material that you will be using stick to it more. The shrink plastic that I got is already rough on one side, so no sanding needed for me. 

Get a sheet of shrink plastic and dab your choice of stamp on the rough side of the shrink plastic. I will be coloring in my stamped images so I used the StazOn Solvent ink pad in Jet black because I wanted to make sure the ink will not run or smudge when I fill it with color. Remember to clean your stamps completely before you keep them! This will prevent it from further discoloration and of course so it will not stain your other ink pads. Other people have special stamp cleaners, I just use the regular baby wipes.


Let the StazOn dry a little bit before you start coloring in so that the ink will not smudge. I used my trusty stash of Sharpies for coloring. Remember, you have to color on the rough side of the plastic, on top of your stamped image. I like using lighter colors for my shrink plastic because it gets darker and brighter after it shrinks.

After coloring, preheat your oven toaster for a couple of minutes. While waiting for the oven toaster to heat up, cut the shrink plastic carefully and place the cutouts on a sheet of wax paper (still rough side up). Your oven should be ready then. Place the cutouts in the oven and set the timer to 1-2 minutes. That should allow the shrink plastic to “cook”. The plastic will begin to shrink (watch it! it's like magic!!) and when it stops shrinking, you will need a spatula to press on it and make it flat. Leave it in the toaster for another minute, take it out then wait for another 3 minutes for the shrink plastic to cool down before you take it out of the wax paper.


After it cools down, you can easily turn your shrink plastic to cute paper clips! Put a drop of E600 industrial strength adhesive at the back of the shrink and place your paperclip. Let the glue dry completely for 24 hours in a well-ventilated area.


And after 24 hours, you have your very own Mommylhey design paperclips! Isn't that fun?!


That's all! Now, I'm off to make more paperclips! I bought 3 extra packs of shrink plastic so I could play around.  LOL! Let me know if you tried shrinking. Enjoy!